Cute School Supplies Characters: An Embroidery Designer’s Review
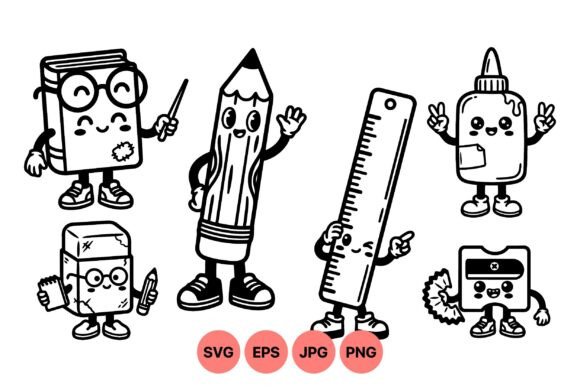
When a new illustration lands in my inbox, I don’t just look at the preview image. I think about thread, stabilizer, fabric, and how many times a client will smile when they see the finished piece. The Cute School Supplies Characters graphic caught my eye immediately. It’s a black and white cartoon vector filled with cheerful pencils, books, rulers, erasers, glue bottles, and sharpeners, all wearing happy expressions and playful poses. As a designer who stitches for everything from toddler tees to boutique tote bags, I knew within minutes this one had real potential — but also a few practical quirks worth noting before you digitize and hoop up.
What I’m sharing here isn’t a light description. It’s the kind of honest, use-case thinking you do when you’re about to spend time converting a graphic into a machine embroidery design for a paying customer or a handmade product line. I’ll walk through how this illustration behaves in the real world, where it thrives, and where you need a careful hand.
The Mood and Personality of the Design
Right away, the Cute School Supplies Characters artwork feels warm, approachable, and unmistakably child-friendly. The faces aren’t just simple dots — each character has a distinct expression, which adds a lot of personality. The pencil looks excited, the book seems almost wise, and the little glue bottle has a mischievous tilt. This range of emotion creates a design that feels animated rather than static. Stitched onto fabric, that emotion translates into a product that people connect with instantly.
Because it’s a black and white vector illustration, the mood lands somewhere between a storybook sketch and a modern minimalist icon set. It’s not overly cute or saccharine. The clean linework gives it a crisp, professional feel that could work equally well on a baby onesie or a craft fair tote bag. For embroidery, the absence of pre-colored sections is actually a gift — it means you, the digitizer, get to decide the thread palette and stitch type without fighting a built-in color scheme.
A Real Embroidery Project: Tote Bag for a Teacher
Last week, I needed a fast turnaround for a back-to-school gift. A client wanted a custom teacher appreciation tote bag — something a first-grade educator could carry with pride. I pulled up the Cute School Supplies Characters file, grouped the smiling pencil, ruler, and book, and began digitizing a design that would sit on the front pocket of a natural canvas tote.
I chose a single-color stitching approach, using a deep navy thread on the cream fabric. The outline style of the illustration meant I could lean heavily on a running stitch for the main bodies, with a narrower satin stitch for the eyes and tiny accents. The happy expressions and rounded shapes stitched out cleanly at a 4x4 inch size. The glue bottle’s little cap and the sharpener’s ridged edge needed slight simplification in the digitizing software — I slightly reduced the number of tiny zigzag lines to prevent thread buildup in a small area. This is the kind of judgment call you make when a design is originally a vector for print, not a stitch file.
The finished tote bag got an immediate “Aww, that’s so sweet!” from the client. The teacher later told her she loved that it wasn’t just a generic apple or school bus — the characters felt personal and fun. That’s the power of a design with genuine personality.
Where the Design Shines and Where It Needs Care
The Cute School Supplies Characters illustration is naturally suited to a range of embroidery projects. It would look right at home on custom apparel like sweatshirts, t-shirts, and baby clothes, as well as tote bags, aprons, pillow covers, tea towels, and blankets. For an Etsy seller or small shop owner, the set could easily become a signature line — think a matching lunch bag and pencil case set, or a nursery decor hoop art piece.
However, there are a few places where I’d recommend using the design with caution. The original line art is fairly detailed, especially around the book’s pages and the ruler’s markings. In very small hoop sizes — under 3 inches wide — those fine details can blur together or create dense, stiff stitch areas that don’t drape well on wearable fabrics. If you’re stitching on stretchy fabric like a cotton-spandex blend, you’ll need a solid cutaway stabilizer and possibly a topper to keep the fine lines from sinking into the knit.
Small Hoop Sizes and Detail Loss
When I tested a 2.5-inch version of just the pencil and sharpener on a baby bodysuit, the tiny facial features became a bit muddy. The thread build-up near the eyes made the fabric pucker slightly. For that scale, I’d recommend either enlarging the design slightly or editing the vector to remove the smallest interior lines. Running a few test stitches on scrap fabric is non-negotiable here — what looks crisp on a screen can turn into a blob in thread.
Fabric Choices and Stabilizer Planning
On thick, textured fabrics like a waffle-weave kitchen towel, the black and white contrast becomes less distinct. If you’re stitching on dark fabric, the traditional black outline may disappear entirely. The solution is simple: recolor the vector to a bright thread color before digitizing, or use a white or pastel shade for the stitching. The design’s line-art nature makes it incredibly flexible for color changes. For curved surfaces like caps, the taller characters — like the ruler — might need to be rotated or repositioned to avoid distortion along the seam.
Visual Impact and Customer Perception
From a buyer’s perspective, the Cute School Supplies Characters are instantly recognizable and emotionally appealing. Parents and grandparents see a playful, nostalgic design that reminds them of their own school days. Kids respond to the cheerful faces. When you list a finished product online — whether it’s an embroidered patch, a personalized sweatshirt, or a printable mockup — the design’s clear, uncluttered silhouette helps it stand out in thumbnail photos. That’s a huge advantage for Etsy sellers and small shops competing in crowded markets.
The black and white vector style also lends itself beautifully to printable mockups and digital product previews. You can use the same graphic to create professional listing images before you even stitch a sample, which speeds up your design-to-market timeline. The consistency across product photos builds brand trust and gives your shop a cohesive look.
Technical Notes for Digitizing and Stitching
If you’re digitizing the Cute School Supplies Characters yourself, here are a few insights I gathered from my own tests:
- Stitch type: A running stitch works beautifully for the main outlines, keeping the design light and soft. For the eyes and small accents, a narrow satin stitch adds just enough definition without bulk.
- Stitch density: Because the original art is line-based, you don’t need heavy fill stitches. Overly dense areas can make the fabric stiff, especially on children’s garments. Aim for a light, open feel.
- Thread colors: The black and white original is a perfect starting point, but don’t hesitate to experiment. A warm gray or a soft pastel set can transform the mood for a baby shower gift or a nursery piece.
- Hoop size: I recommend a minimum 4x4 hoop for the group of characters. For a single character like the glue bottle or eraser, a 3x3 hoop can work if you enlarge the element slightly and simplify the interior lines.
- Test on scrap: Always stitch a sample on the same fabric and stabilizer combination you plan to use for the final product. Check how the thread tension holds the tiny details, and adjust the digitizing file if you see any pulling or gaps.
One thing I particularly appreciate is that the Cute School Supplies Characters illustration doesn’t dictate a specific stitch format. You can use it as a base for an applique design by adding a placement line and tack-down stitch, or you can convert it into a pure outline embroidery file. The versatility gives you a lot of creative room.
Commercial Use and Licensing Check
Before you sell any finished product featuring this design — whether it’s a physical item like an embroidered patch or a digital product like a custom embroidery file — you must verify the commercial license terms. The product description says “Download,” which suggests you receive a digital file. In my experience, vector illustrations from graphics marketplaces often come with a standard license that allows some commercial use, but the exact scope can vary. Look for the license file or the product page details to confirm whether you can use it on items for sale, on print-on-demand products, or as part of a digital design bundle. If you plan to include it in a craft business line or sell stitched products on Etsy, proper licensing is a non-negotiable step.
Final Verdict
The Cute School Supplies Characters illustration is a cheerful, well-drawn asset that translates into embroidery with a little thoughtful digitizing. It’s not a push-button embroidery file, but for a designer who enjoys the conversion process, it offers a lot of flexibility. The clean black and white lines, happy expressions, and playful poses make it a smart choice for children’s products, teacher gifts, and back-to-school merchandise. It holds up beautifully on medium-weight woven fabrics, and with the right stabilizer, it can work on knits and towels too.
I’ll be using this set again for baby shower onesies, pencil case patches, and a set of matching kitchen towels for a teacher’s lounge. The reaction from customers so far has been overwhelmingly positive, and I’ve already seen a few repeat buyers request the same characters in different thread colors. If you’re looking for a machine embroidery design starter that feels personal and marketable, Cute School Supplies Characters is a solid, practical pick. Just remember to test your stitch-out, mind the small details, and always keep a scrap piece of fabric ready before you commit to the final product.